As production manager, project manager, quality manager or engineer, you can encounter residual magnetism in products, components or workpieces.
Residual magnetism can be found, among other things, in motor and gear parts, in rolling or sliding bearings, in entire machining centres, and also in injection needles in medical technology or in precision parts in the watchmaking industry. More and more companies are specifying defined residual magnetism limits in their working drawings, which their components must comply with. Manufacturers of stamping and press brakes accept up to 20 A/cm on tools. Cleaning of parts or electroplating is generally more demanding, with parts being allowed to have a maximum of 2-8 A/cm.
What is residual magnetism?
When a ferromagnetic material is exposed to an external magnetic field, the workpiece is magnetized to a greater or lesser extent, depending on the material and shape. The magnetisation takes place in three stages. First, the Bloch walls shift and begin to fuse. Later, the elementary magnets of the material align themselves with the external magnetic field and are finally anchored in the material (magnetic dipole). This happens, for example, when a magnet adheres to the component or when magnetic clamping devices are used. The strength of the magnetic field is measured as field strength H in the unit A/m (ampere/meter). After removal of the external magnetic field, a certain amount of magnetisation remains in the component. This part is known as remanence or residual magnetism; depending on the economic area, the units A/m, A/cm, mT (millitesla) or Gauss are used here.
Different types of residual magnetism and their causes
The first magnetic influence on the component already occurs in the steel mill. After the annealing or rolling process, ferromagnetic steels can be magnetized during cooling under the influence of the earth’s magnetic field. The following three categories of residual magnetism can occur in ferromagnetic components:
- Dipole magnetization of the component with a main pole formation
- fine-polar magnetization, that is a magnetization at the part surface with a small range of the magnetic stray field
- Mixed form of both types of magnetisation in different parts of the component
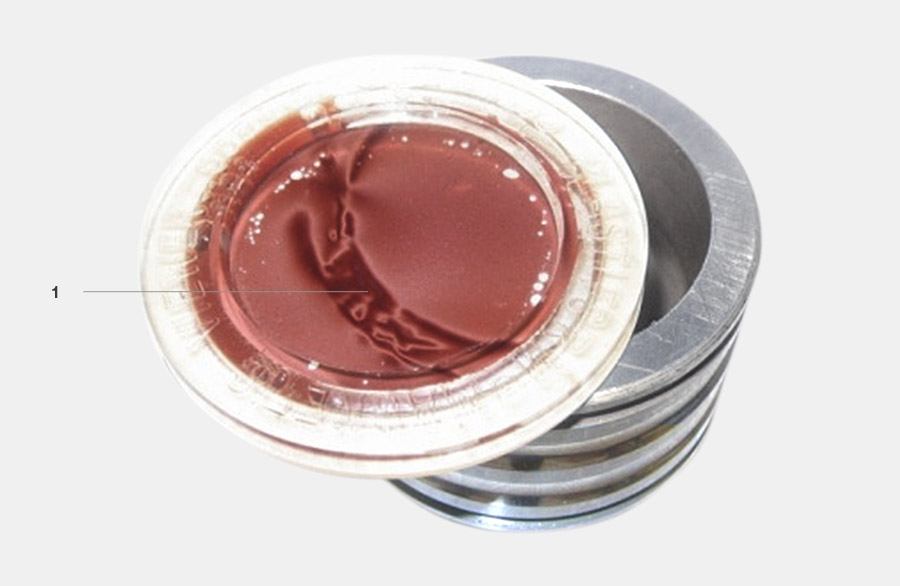
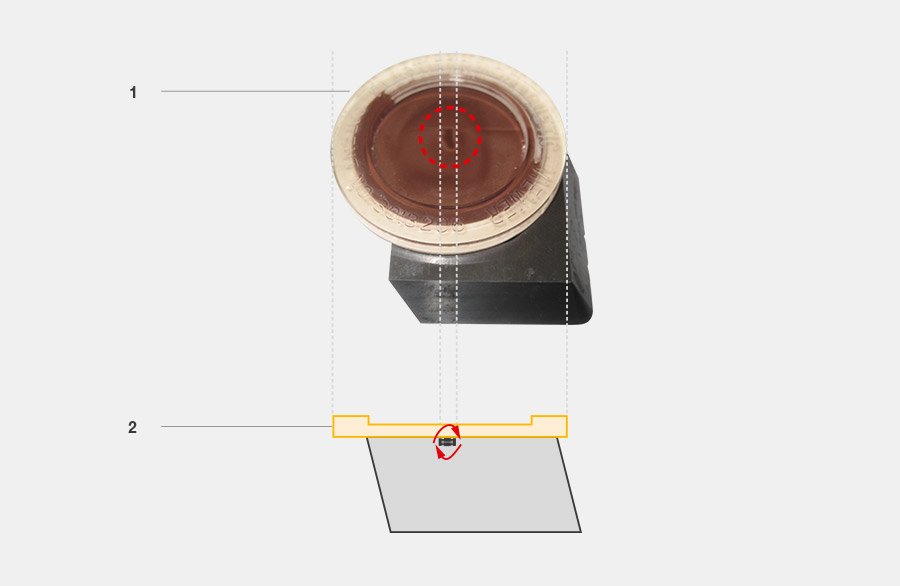
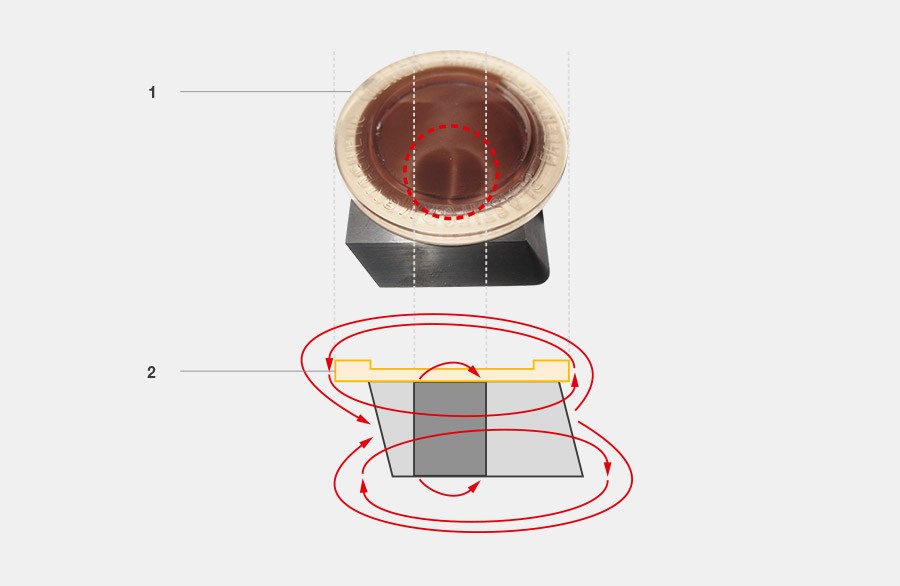
The processes in the steelworks tend not to magnetize the raw material. Such parts can even have a neutral magnetic structure which is ideal from a magnetic point of view.
Contact with magnetic lifting and clamping devices destroys the ideal magnetic state and the magnetic crack detection widely used in industry.
Fine-pole residual magnetism is created in the course of a further manufacturing process: a component can come into contact countless times with more or less strong magnetic fields of random polarity. These can come from various sources or processes, such as linear oscillators, cutting tools, hardening processes or similar. Such magnetic effects tend to lead to a fine-polar magnetization of the component.
The following list shows which processes can cause residual magnetism and how high this can be. The remanence depends on the material of the component that passes through the process; the values given are standard values measured with a Hall probe at a measuring distance of 0.5 mm.
- >100 A/cm Crack testing (magnetic particle and flux leakage testing)
- >100 A/cm Use of load lifting or handling magnets (permanent or electrical)
- 50–>100 A/cm Use of clamping devices (permanent or electrical)
- 50–>100 A/cm Setting down magnetic stands (e.g. dial gauges)
- 30–60 A/cm Welding process
- 30–50 A/cm Machining with magnetised tools, clamping devices etc.
- 30–40 A/cm Handling with magnetised tools, holders, grippers etc.
- 10–20 A/cm Galvanic and electro-erosive processes (chrome plating, eroding etc.)
- 5–15 A/cm Some PVD coating processes (e.g. magnetron sputtering)
- 5–15 A/cm Forming processes (structural change in the material)
What the different field strength values mean in practice
Here are a few examples of how a certain magnetism value can affect an object:
- > 1000 A/cm = Strength of a permanent magnet
- 20–200 A/cm = Magnetisation after contact with a magnetic clamping plate, depending on the material properties
- > 10 A/cm = Components begin to adhere to each other
- > 8 A/cm = Metal chips adhere
- > 4 A/cm = Smallest metal parts adhere and contaminate the workpiece
- > 2 A/cm = Grinding dust adheres
- > 1,5 A/cm = Electron beam welding is affected
- ~ 0,4 A/cm Approximately the field strength of the earth’s magnetic field
How is residual magnetism measured?
Residual magnetism in components is usually measured with a hand-held magnetic field meter. These measuring instruments are called magnetometers, field meters, gaussmeters or teslameters.
The magnetization of a component can only be effectively measured on its surface. There the magnetic field lines emerge from the material and can be detected by the measuring device. From a distance of 2 mm above the surface of the component, however, the limit is already reached in some cases – from then on, fine-pole magnetism will hardly be detectable.
The measurement result depends on the construction and design of the measuring probe.
The distance to the surface plays an important role. If the probe is also equipped with a flow collector, the measurement results can again change considerably.
Nowhere is it bindingly specified how to proceed when measuring residual magnetism, because there are no standards. Although internal company standards are formulated, these are usually not compatible with each other in a supply chain. This leads to discrepancies and misunderstandings. For this reason, a description must be given for each measured value, with which measuring probe and in which environment it was determined. In this way the respective measured value of the workpiece can be interpreted and traced at any time. Slim measuring probes which are not specially designed for measuring residual magnetism can lead to considerable measuring errors due to even slight mechanical stress such as bending of the probe.
The most important points when measuring residual magnetism
When measuring residual magnetism, a measuring instrument must be used which can reliably detect even small-scale magnetic field characteristics and display the values. The following points must be observed for the appropriate search method:
- A measuring instrument should be used which is already established in the industry and for which measuring procedures exist. In Europe, the measuring instrument we produce has become a quasi-standard. Asia also uses equipment of a similar type. In the USA, measurement using a gaussmeter as a clock is still widespread.
- Before measuring, a suitable search method is defined so that the results are reproducible and comparable.
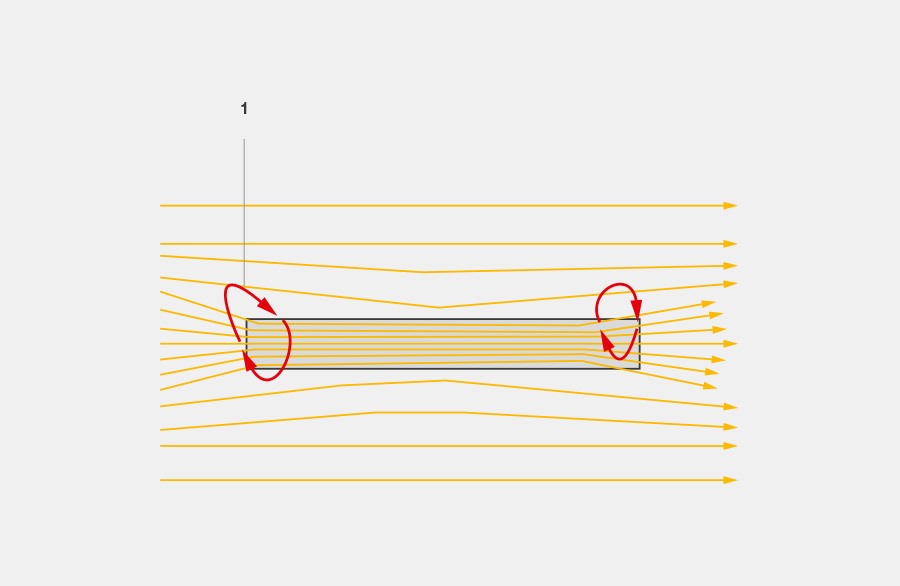
- Ambient magnetic fields can falsify the measurement result. This is due to the high permeability of a ferromagnetic workpiece which can multiply the ambient field. The earth’s magnetic field is such a magnetic field – because external magnetic fields are concentrated in the component. With elongated components, the effect can be increased 5-10-fold. This induced magnetism is vectorially added or subtracted to the residual magnetism of the component.
Measuring residual magnetism on the surface of a component
Residual magnetism on the surface of components is not necessarily generally distributed, but may be position-dependent. It may be that a single tiny area on the component is magnetic, while the rest of the component has no magnetism. This means that the entire surface of the component must be scanned to exclude residual magnetism.
The magnetic attraction of particles to a component depends not only on the field strength, but also on the particle shape and field gradient. Slim particles are attracted more strongly than spherical ones. Corners and protruding edges, such as those of threads, generate higher field strengths and field gradients due to the field concentration, as a result of which magnetisable particles are attracted more strongly. For this reason, corners and edges must be checked for residual magnetism to a greater extent.
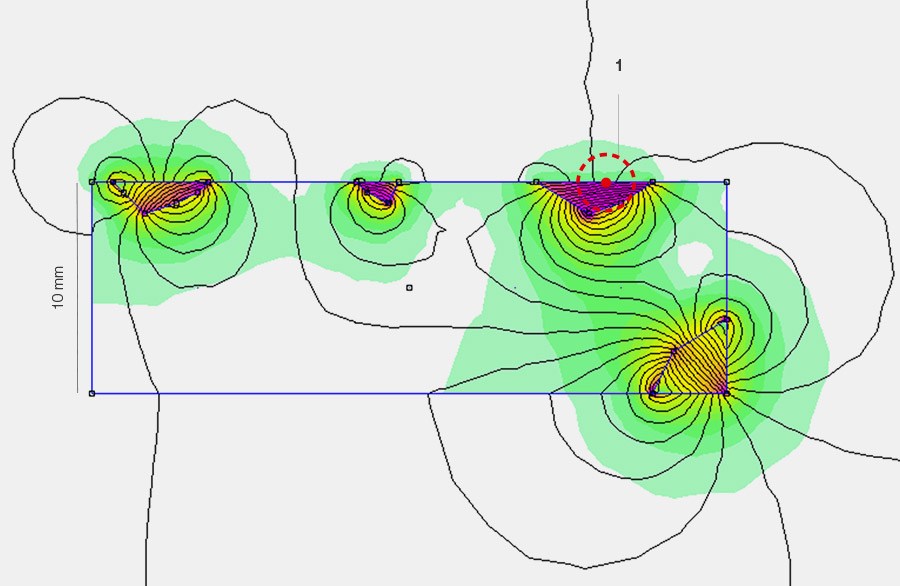
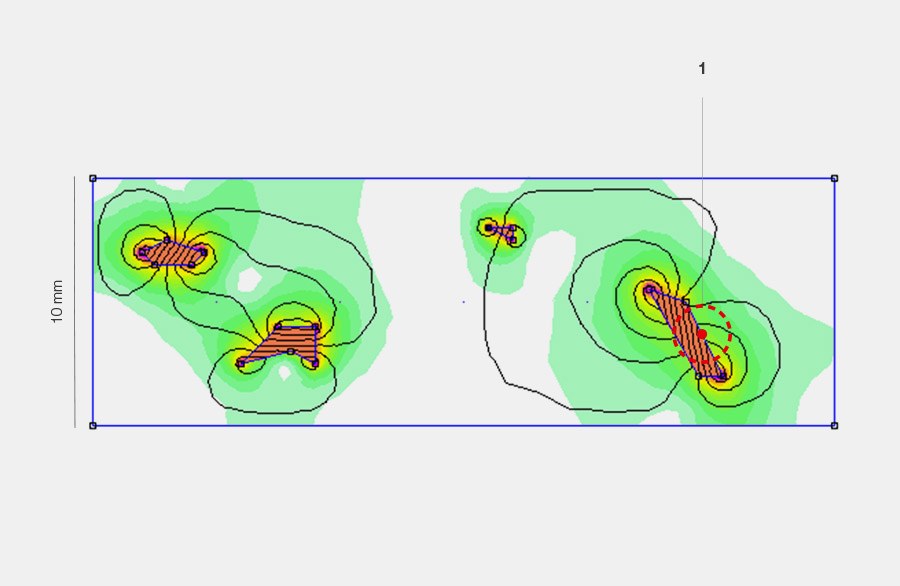
With fine-pole residual magnetism, the magnetic field lines between the north and south poles take short paths. Even at a distance of a few millimetres above the surface of the component, the magnetic points are practically undetectable – although the field line density directly at the surface can be very high and the component strongly attracts ferromagnetic particles.
Measurement error with fine pole magnetization
In the case of fine-pole magnetization, the distance between the sensor and the surface must be as small as possible, since the field lines are directly on the surface of the component. A measuring instrument with flux collector is unsuitable, as these smooth the leakage flux of the fine-pole residual magnetism, which means that nothing can be measured. Dial gauges, which are widely used in the USA, cannot detect fine pole magnetism, mainly because the sensor distance to the component is too large.

A relatively strong, but spatially limited fine pole magnetization can only be detected with a suitable teslameter.
Measurement error with dipole magnetization
In the case of dipole magnetization, however, measuring instruments with flux collectors show a too high measured value: If a measuring instrument with flux collector is used to measure dipole magnetization, the flux collector directs the far-reaching stray fields concentrated on the Hall sensor and tends to increase the measured value.

Comparison measurement of dipole magnetization: A teslameter with flux collector directs far-reaching stray fields directly onto the Hall sensor and thus tends to increase the measured value.
Measuring magnetism inside a component
Magnetization inside a component can only be anticipated to a very limited extent from the residual magnetism measured at the surface – a closed magnetic circuit inside a component cannot be measured non-destructively. The deceptive thing about this scenario is that no magnetism is measured, but it is still present. The problem with magnetism inside a component is that over time it can magnetize its surroundings, causing it to escape again. If the component is now cut open, the self-contained field lines can escape at the cut surface, making the component magnetic. It is therefore recommended not to rely exclusively on measurements at the surface. It is advisable to demagnetize in principle with a suitable demagnetization method which magnetically controls the components by process control. Only this will ultimately guarantee high product quality.
Automatic measurement of residual magnetism
A frequently expressed wish in industrial production: Instead of determining magnetism by means of manually measured random samples, many companies would like to have an automated procedure that allows the quality of the overall production to be easily determined. However, due to its nature, the fine-pole residual magnetism can basically only be determined by manually scanning the surface of the component. For certain applications it may be possible to use highly sensitive sensors which can distinguish between demagnetized and non-demagnetized components over a greater distance. Such highly sensitive magnetic field sensors exist on the market, for example the A-Test LT. However, since these devices are only suitable for certain applications, it must be clarified in advance whether such a system can be used or not.
Suitable and unsuitable measuring devices for residual magnetism
To detect residual magnetism on the components, it is important to use a suitable measuring device. Particularly in the case of spatially limited magnetic fields or fine-pole residual magnetism, a small distance between the measuring probe and the surface of the component must be ensured.
Requirements for a device for measuring residual magnetism
An optimal measuring instrument has the following characteristics:
- digital display of the measured value with resolution 0.1 A/cm, 0.01 mT or 0.1 Gauss and with a low drift
- a function to automatically hold the highest measured values, coupled with a fast sampling rate to determine the maximum measured value; advantageous: the possibility to store both poles (north and south pole)
- clearly visible Hall sensor, so that an exact positioning on the surface of the component can be made
- very helpful: an LED combined with the Hall sensor, which responds even at low residual magnetic fields (< 2 A/cm) (do not overlook places with potential magnetic field; possibility to scan a magnetic field detected in this way more closely)
- the closest possible distance between the Hall sensor installed in the measuring device and the surface (otherwise there is a risk that the magnetism value is displayed too low or not displayed at all)
The following are the characteristics of a suitable probe:
- Distance of the Hall effect zone to the component surface: ~ 0.5 mm
- no magnetic flux collector
- mechanically stable probe
- accurately positionable
- fast response to magnetic fields
Influences when measuring residual magnetism
Undefined procedures, an undefined or unsuitable measuring device, the influence of an ambient field during the measurement: These factors are responsible for inaccurate residual magnetism measurements. The results vary greatly, are inaccurate and difficult to reproduce.
In order to obtain reproducible residual magnetism measurements, the following two additional points play an important role:
- Measurement environment:
- The measurement should only take place under magnetically shielded conditions, preferably within a zero-Gauss chamber.
- Measurement in the earth’s magnetic field is only permissible for limit values > 10 A/cm or for components with large dimensions. In order to obtain measurement results that are as reproducible as possible, the component should always be aligned in the same way, preferably in an east-west direction.
- Search methodology:
- The residual magnetism on the surface of the component must be scanned over the entire surface with the probe. Punctual measurements are not or only slightly meaningful.
- The operator has a great influence on the measurement result, ideally trained personnel should be used.
We recommend that the measurement methodology and measuring equipment used be recorded in writing.
Influence of the earth’s magnetic field during residual magnetism measurement
The magnetic field of the earth has an average strength of ~ 0.03 to 0.06 mT. The direction of the field lines is essentially parallel to the north-south axis in the open air, in Central Europe with an inclination of about 45° to the earth’s surface.
In rooms with large machines, the earth’s magnetic field can also be distorted in direction and strength by surrounding ferromagnetic structures.
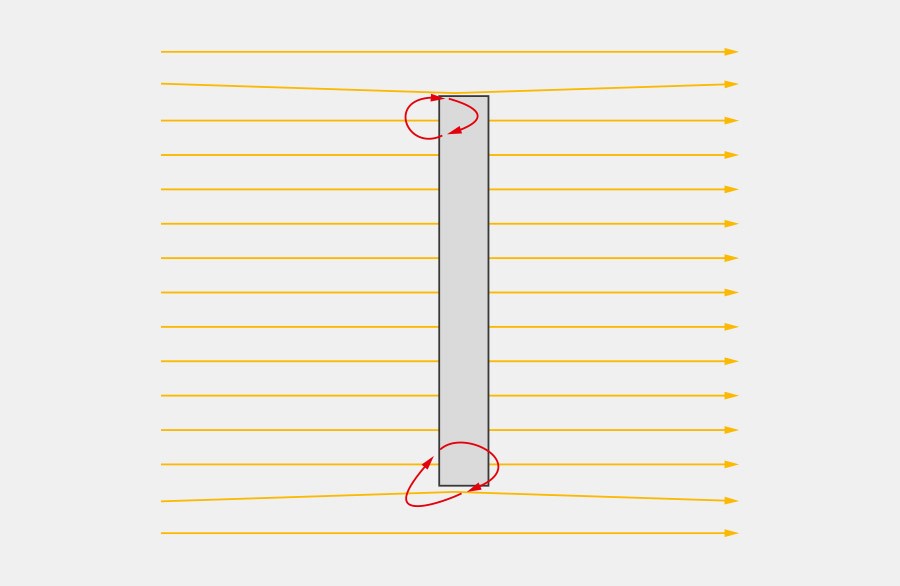
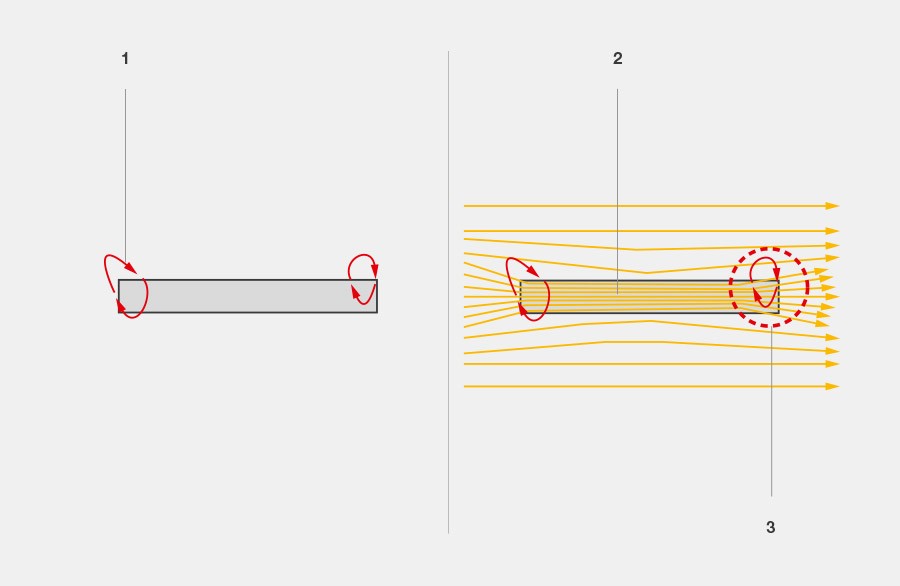
A ferromagnetic component attracts the field lines of the surrounding magnetic fields. The strength of the induced magnetic fields depends on the permeability of the material, the geometry, the size and orientation of the component in the surrounding field. If, for example, a component is positioned in the direction of the field lines of the earth’s magnetic field, these are induced into the component, and the magnetization of the component can be increased several times over the surrounding field. This is because a component made of iron and steel conducts 700 to 5000 times better than air, and the magnetization of the component is increased accordingly (or reduced if the field direction is in the opposite direction).
If the same component is perpendicular to the field lines of the earth’s magnetic field, significantly lower field strengths are induced (see figure below).
The ideal environment for measuring residual magnetism in assemblies
Idealerwith this method, the components are measured in an almost field-free environment.
This is especially true for assembled assemblies. The induced fields spread very differently in the component and thus prevent an exact measurement.
The initial permeability of a ferromagnetic material can be very high, so that halving the ambient field can already mean a reduction of 5 times the induced field. Accordingly, a shielding factor of 5 is already more than sufficient for a reproducible measurement.
Shielding can be achieved by means of a zero-gauss chamber – a passive shielding chamber with walls of highly permeable material. However, there is also the possibility of using an active Helmholtz chamber, the sides of which consist of coils which cause the earth’s magnetic field inside to displace homogeneously occurring magnetic fields by means of opposing fields generated by electrically energised coils. The Helmholtz chamber is particularly suitable for larger components.
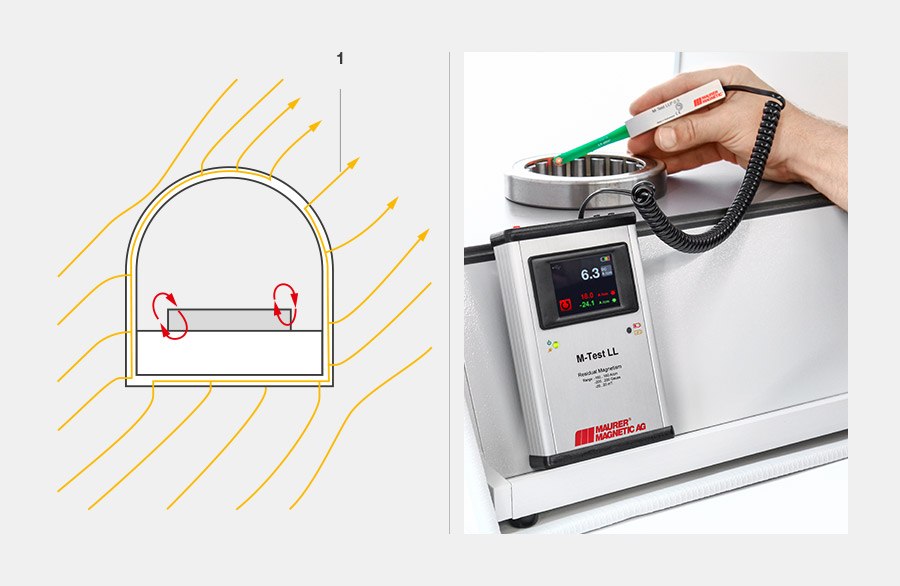
Other measuring methods – Measurement of the magnetic moment
Another way to determine the magnetization of a component is to measure the magnetic moment. Here, the magnetic moment is not measured directly, but the magnetic field exiting the component; this must be measured at a defined distance and in each axis. The magnetic moment can then be calculated using formulas.
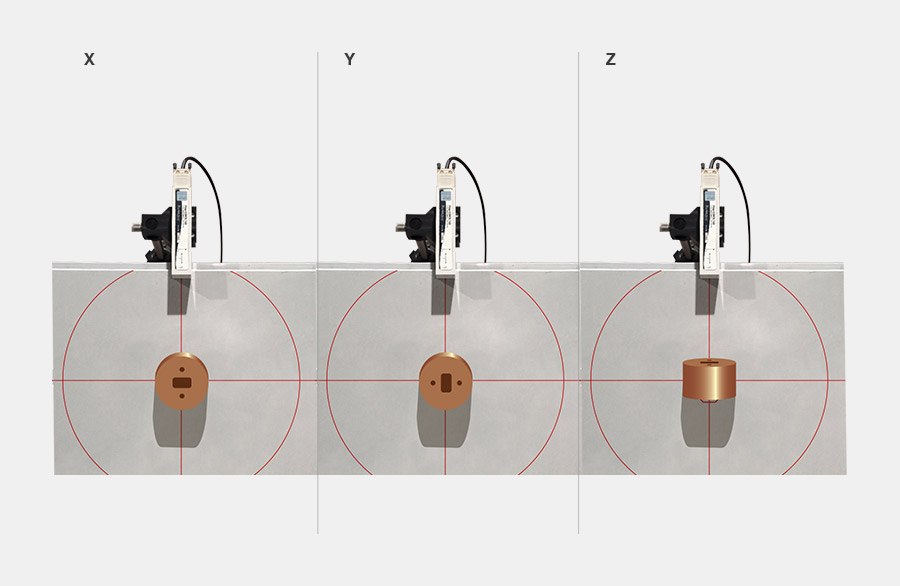
Especially applications in aerospace and research often use the magnetic moment to determine the magnetization. Components of satellites must be inspected in detail, because even the slightest residual magnetism can influence the measuring equipment on the satellite.
For a precise determination of the magnetic moment, the magnetic fields surrounding the component must be measured in the nT range. To avoid measurement errors, the surrounding field must be kept stable during the entire measurement. If the measurement is carried out in a building that is not specially shielded, a motor vehicle passing within 100 meters of the component can influence the measurement result to such an extent that the measurement result becomes unusable. Precise magnetic torque measurements are therefore often carried out in remote locations far away from the external influences of civilisation.

